Colour Pop Wedding Stationery…Fresh and fun with a pop of colour
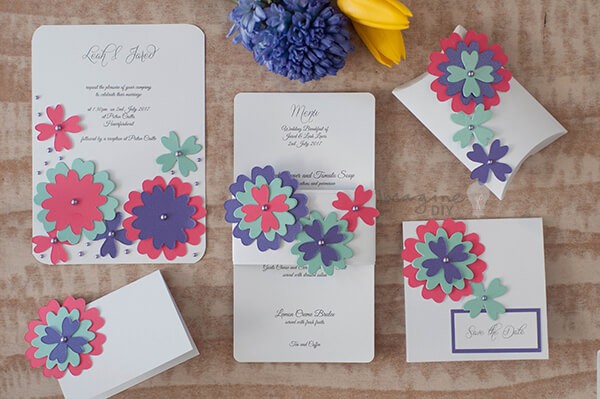
It is so easy to get used to designing in neutrals. But adding a splash of colour gets us really excited. That's why we have put together this fun and vibrant range of Colour Pop Wedding Stationery. The good thing is you can easily recreate at home. Just change the colours and you create something completely unique to your special day.
This range does require a Sizzix Machine and dies. It can seem like a large one off expense but if you use it across all your wedding stationery, it will work out really economical (much more economical than purchasing embellishments). And the best thing about the Sizzix Machine is that you can have fun with it for years to come.
Here’s how we made this eye catching range:

INVITATION
For each invitation you will need:
1/2 sheet of Matt White Card. (click here)
1/4 sheet of Cerise Card. (click here)
1/5 sheet of Pearlised Turquoise Card. (click here)
1/5 sheet of Pearlised Plum Card. (click here)
Appx. 20 self adhesive pearls in pink/lilac. (click here)
Paper Trimmer
Hot Melt Glue Gun. (click here)
Sizzix Machine
Sizzix Bigz Die Flower Layers with Heart Petals die set
Crop-A-Dile Corner Chomper (rounded)…….this is not totally necessary but it does add a lovely finishing touch!
INSTRUCTIONS:
Print your wording on to the Matt Off White Paper and cut down to size. The finished size should be 12.5cm wide x 17.5cm high. Remember to keep the wording set in the top half of the page with the bottom half of the page left blank (this is where your flowers will be stuck)
(You should be able to print 2 invitation panels on each sheet if you use a landscape format)
Use your Crop-a-dile Corner Chomper to punch rounded corners on each side of the invitation.
Use your Sizzix Machine and die to make as many flowers as you can fit on to each sheet of coloured A4 card. To get as many flowers as possible, I like to cut the card into squares slightly larger than the shape of each flower.
Use your glue gun to stick and layer the flowers on to the card until you are happy with the way they look (It’s often useful to lay them all out before you stick them down and then pick them up and glue them one by one). To add a bit more fun, it’s really nice to layer them as you go along.
Peel off various sized self adhesive pearls and stick them in the centre of each flower. To add a nice finishing touch, scatter a few self adhesive pearls around the flowers (but beware of using too many!)
So now you’re gorgeous invitation is finished!
TIP……you can use any left over die cut flowers to decorate other items of stationery or for finishing touches on your special day.

SAVE THE DATE CARD
For each Save The Date Card you will need:1/2 sheet of Matt White Card. (click here)
1/4 sheet of Matt White Paper. (click here)
1/10 sheet of Cerise Card. (click here)
1/10 sheet of Pearlised Turquoise Card. (click here)
1/4 sheet of Pearlised Plum Card. (click here)
Appx. 20 self adhesive pearls in pink/lilac. (click here)
Paper Trimmer
Scorer
Hot Melt Glue Gun. (click here)
Double Sided Tape or tape runner. (click here)
Sizzix Machine
Sizzix Bigz Die Flower Layers with Heart Petals die set
INSTRUCTIONS:
Cut a piece of matt white card 21cm x 10.5cm. Score and fold in half.
Print your wording on to the Matt Off White Paper and cut down to size. The finished size should be 8.5cm x 8.5cm (You should be able to print 4 invitation panels on each sheet if you lay them out carefully)
Cut a piece of Pearlised Plum Card 9cm x 9cm. Stick this to the inside of your save the date card using double sided tape. Stick your invitation panel on top.
Print your “Save The Date” tag on to a sheet of A4 paper and cut down to size. The finished size should be 5cm x 2.5cm. (You should be able to fit at least 20 of these tags on to each sheet)
Cut a piece 0f Pearlised Plum Card 5.5cm x 5cm. Stick this on to the front of your card at the bottom right using double sided tape. Leave a border of about 0.5cm at the bottom and to the right. Stick your Save The Date Panel on top.
Use your Sizzix Machine and die to make the following flowers: 1 Large Flower in Cerise Pink, 1 Medium flower in turquoise, 1 small flower in Plum and 1 in turquoise. I like to cut the card into squares slightly larger than the shape of each flower to maximise the amount I can get from each sheet.
Use your glue gun to stick the large pink flower to the top left of the card (you only need to put glue in the centre). Stick the turquoise flower on top and finish with the small plum flower. Add a self adhesive lilac pearl to the centre.
Carefully lift up the bottom right of the pink flower (the part that is not stuck down). Slide part of the turquoise flower underneath and glue in to place. Add a self adhesive lilac pearl to the centre of the flower.
That’s all you need to do.

PLACE CARD
For each Place Card you will need:For each Save The Date Card you will need:
1/4 sheet of Matt White Card. (click here)
1/10 sheet of Cerise Card. (click here)
1/12 sheet of Pearlised Turquoise Card. (click here)
1/20 sheet of Pearlised Plum Card. (click here)
Other things you might need:
Appx. 20 self adhesive pearls in pink/lilac. (click here)
Paper Trimmer
Scorer
Hot Melt Glue Gun. (click here)
Sizzix Machine
Sizzix Bigz Die Flower Layers with Heart Petals die set
INSTRUCTIONS:
Cut a piece of matt white card 14cm x 10cm. Score and fold in half.
Use your Sizzix Machine and die to make the following flowers: 1 Large Flower in Cerise Pink, 1 Medium flower in turquoise, 1 small flower in Plum. I like to cut the card into squares slightly larger than the shape of each flower to maximise the amount I can get from each sheet.
Use your glue gun to stick the large pink flower to the top left of the place card (you only need to put glue in the centre). Stick the turquoise flower on top and finish with the small plum flower. Add a self adhesive lilac pearl to the centre.
Now your fun little place card is ready for you to write your guest names.

FAVOUR BOX
For each Favour Box you will need:For each Save The Date Card you will need:
1/2 sheet of Matt White Card. (click here)
1/10 sheet of Cerise Card. (click here)
1/20 sheet of Pearlised Turquoise Card. (click here)
1/12 sheet of Pearlised Plum Card. (click here)
Other things you might need:
Appx. 20 self adhesive pearls in pink/lilac. (click here)
Paper Trimmer
Scorer
Hot Melt Glue Gun. (click here)
Sizzix Machine
Sizzix Bigz Die Flower Layers with Heart Petals die set
Pillow Box with Labels Die by Sizzix
INSTRUCTIONS:
Cut your matt white card in half and use the Sizzix Machine and Pillow Box Die to make the box shape. Fold in to shape and use your glue gun to secure it together along the sides (leaving each end free). With hardly any effort and at very low cost, you should now have a lovely white pillow shaped box ready to fill with goodies for your guests.
Use your Sizzix Machine and die to make the following flowers: 1 Large Flower in Cerise Pink, 1 Medium flower in plum, 2 small flower in Turquoise and one small flower in plum. I like to cut the card into squares slightly larger than the shape of each flower to maximise the amount I can get from each sheet.
Use your glue gun to stick the large pink flower to the top left of the box (you only need to put glue in the centre). Stick the plum flower on top and finish with the small turquoise flower. Add a self adhesive lilac pearl to the centre.
Tuck your small turquoise flower slightly under the bottom right of the pink flower to create an overlapping effect. Glue in to place and add a self adhesive lilac pearl.
Stick your small plum flower in to place next to the small turquoise flower and finish off with a self adhesive lilac pearl.
Fill up with delicious and exciting things and you’re all ready to go.

MENU CARD / CUTLERY HOLDER
For each Menu Card / Cutlery Holder you will need:2/3 sheet of Matt White Card. (click here)
1/20 sheet of Cerise Card. (click here)
1/10 sheet of Pearlised Turquoise Card. (click here)
1/10 sheet of Pearlised Plum Card. (click here)
Other things you might need:
Appx. 20 self adhesive pearls in pink/lilac. (click here)
Paper Trimmer
Hot Melt Glue Gun. (click here)
Sizzix Machine
Sizzix Bigz Die Flower Layers with Heart Petals die set
Pillow Box with Labels Die by Sizzix
Print your wording on to matt white card and cut down to size. The finished size should be 10.5cm wide x 21cm high.
Use your Crop-A-Dile Corner Chomper to round the corners of the card.
Cut a strip of card 5cm wide x 23cm long. Cut a second strip of card 4.5cm wide x 23cm long. Use Double sided tape to stick the two pieces of card together at the centre. But make sure you do not stick more than a 5cm width. (or it will pucker when you fold it)
Hold your double strip of card across the middle of your menu. Make sure that you have an equal overlap at each side. Fold the loose edges of the strip carefully around to the back of the menu. Then use double sided tape to stick it together. (Remember to glue the strip so that it forms a wrap. But do not stick this on to the actual menu or you will not be able to take it off).
Use your Sizzix Machine and die to make the following flowers: 1 Large Flower in Plum, 2 Medium flowers in turquoise, 2 small flowers in Cerise and one small flower in plum. I like to cut the card into squares slightly larger than the shape of each flower to maximise the amount I can get from each sheet.
Use your glue gun to stick the large plum flower to the top left of the wrap (you only need to put glue in the centre). Stick the turquoise flower on top and finish with the small cerise flower. Add a self adhesive lilac pearl to the centre.
Tuck your medium turquoise flower slightly under the bottom right of the large plum flower to create an overlapping effect. Glue in to place, stick the small plum flower on top and add a self adhesive lilac pearl.
Tuck your small cerise flower slightly under the top right of the medium turquoise flower to create an overlapping effect. Glue in to place and add a self adhesive lilac pearl.
You can have so much fun with this range. Why not play around with it and see what way you can personalise it for your own wedding theme and colours.
As featured in:


