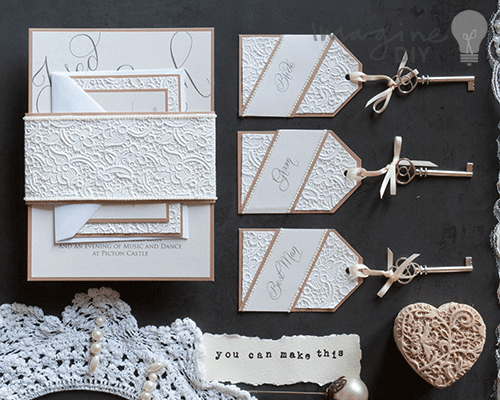
DIY luxury lace embossed stationery you can make at home.
Our gorgeous Lace Embossed Stationery paper is so beautiful, we just couldn't wait to start designing with it. We wanted to create something that oozed both luxury and simple elegance……I’m pretty sure we pulled it off.
This is an easy design to customise to match your wedding theme. Just change the colours or add embellishments to create something that works perfectly for you.

INVITATION / RSVP and WRAP
Here is what you will need:
1 sheet of Kraft Card (click here)
1 sheet pearlised Ivory Paper (click here)
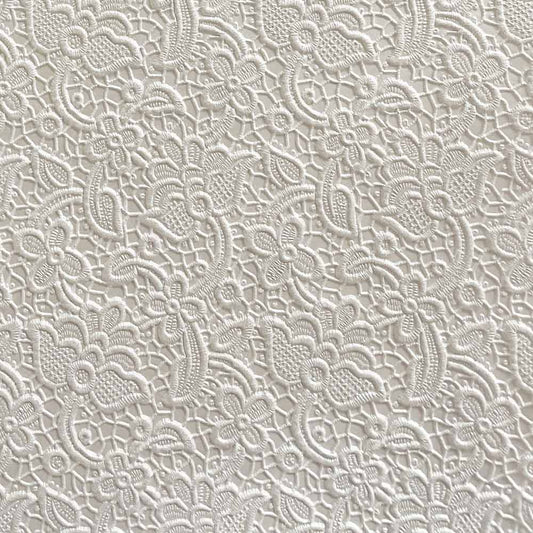
2/3 sheet of Luxury Lace Embossed in Pearl (click here)
1/3 sheet of Kraft Paper (click here)
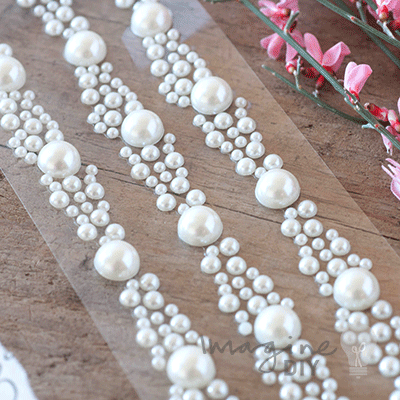
2 rows of 2mm self adhesive pearls (click here)
OTHER THINGS YOU MIGHT NEED:
Paper Trimmer
Tape Runner or Double Sided Tape (click here)
Scissors
INSTRUCTIONS:
- Print your wording on to Pearlised Ivory Paper and Cut down to size. The finished size should be 12.5cm wide x 17.5cm high. You should be able to fit 2 invitations on each panel (or 1 invitation and 2 RSVP’s)
- Cut a piece of Kraft Card 13cm x 17cm. Use your tape runner to stick the invitation panel on top, making sure that the borders are even.
- Print your RSVP wording on to Pearlised Ivory Paper and cut down to size. The finished size should be 6.5cm high x 9cm wide. You should be able to fit 6 panels on each sheet if you lay it out carefully. (or 1 invitation and 2 RSVP’s)
- Cut a piece of Kraft Card 9cm x 11.5cm.
- Cut a piece of Luxury Lace Embossed Paper 8.5cm x 11cm. Stick on top of the Card making sure that the borders are equal.
- Cut a piece of Kraft Card 7cm x 9.5cm. Stick on top of the Luxury Lace Embossed Paper.
- Stick your RSVP wording on top.
- Slot your completed RSVP card inside the flap of the RSVP envelope
- Cut a piece of Kraft Paper 6cm x 28cm
- Cut a piece of Luxury Lace Embossed Paper 5cm x 28cm. Stick the Luxury Lace Embossed Paper on top of the Kraft Paper, leaving an even gap at the top and bottom. This will form your wrap.
- Holding the centre of your wrap against the centre of your invitation, carefully fold the overlapping edges around to the back. Make sure that you do not fold it too tightly because your wrap will need to slide off once you have completed it. A gap of about 1-2mm each side is useful.
- Turn the invitation upside down. Press one loose end of the wrap against the back of the card. Fold the other loose end down and glue it in place on top of the piece you are holding down. This should form a wrap that you can slide on and off the card. It shouldn’t be so loose that it falls off, but neither should it be so tight it can’t be removed with ease.
- Peel off a row of 2mm pearls. Press them along the top edge of the embossed paper. When you reach the end of the row, peel off another row and continue the line until you meet your starting point. Cut off any overlap. When you have finished, it should look as though you have a continuous row of crystals running around the wrap. Repeat this process for the bottom edge of the embossed paper.
- Slide your RSVP card underneath the wrap.
NAME TAGS
Here is what you will need:
1/8 sheet of Kraft Card (click here)
1/12 sheet pearlised Ivory Paper (click here)
2/8 sheet of Luxury Lace Embossed in Pearl (click here)
1/12 sheet of Kraft Paper (click here)
1 row of 2mm self adhesive pearls (click here)
1 Silver Alice Key (click here)
Appx 30cm of 3mm Ivory Satin ribbon
OTHER THINGS YOU MIGHT NEED:
Paper Trimmer
Tape Runner or Double Sided Tape (click here)
Scissors
A hole punch
INSTRUCTIONS:
Before you start your name tags, it’s useful to make 2 templates.1 - Cut a piece of paper 6cm x 8cm. Fold in half lengthways and with the paper folded, use a scissors to cut off the top corner (2cm from the top). When you open the paper, it should leave you with a tag shape. You can use this as a template for your tags.
2 - Cut a piece of paper 5.5cm x 7.5cm. Fold in half lengthways and with the paper folded, use a scissors to cut off the top corner (2cm from the top). When you open the paper, it should leave you with a tag shape that is ever so slightly smaller than the one you just made.
- Cut a piece of Kraft Card 6cm x 8cm. Hold the larger paper template against it and cut off the top edges of card to match the template.
- Cut a piece of Luxury Lace Embossed Paper 5.5cm x 7.5cm. Hold the smaller paper template against it and cut off the top edges of paper to match the template. Stick the embossed paper on top of the Kraft Card.
- Print your names on to a sheet of Pearlised Ivory Paper and cut down to size. You should be printing in the centre of the sheet, with a 2cm gap below and above each name. Cut into strips so that each name is 2cm high but has a long length at either side.
- Cut your kraft paper in to strips 2.5cm long. Stick the name panels on top.
- Now comes the slightly tricky bit……You need to place the name at an angle from the point of the tag to the bottom corner (see the image above). You also need to make sure that the names sits centrally so that there is an equal gap each side of the name. Once you are happy with the position, stick into place. You can then use a scissors to trim off any overlap at each side.
- Peel off a row of 2mm self adhesive pearls and stick into place along the top edge of the name panel, cutting off any excess. Repeat the process for the bottom edge.
- Use your hole punch (or crop a dile) to punch a hole at the top of the tag (about 1.5cm from the top).
- Fold your ribbon in half and push through the hole from the back to the front. Push the loose end of the ribbon through the hole.
- Feed one loose end of the ribbon through the top of the key and tie a neat bow to secure into place.
We hope you find this guide helpful and inspires you to have the confidence to give it a go yourself.